
Guide
How to Build a Home Golf Simulator: Complete Space and DIY Setup Guide
Swinglix may earn a commission when you buy through links on this page, at no extra cost to you. Learn more
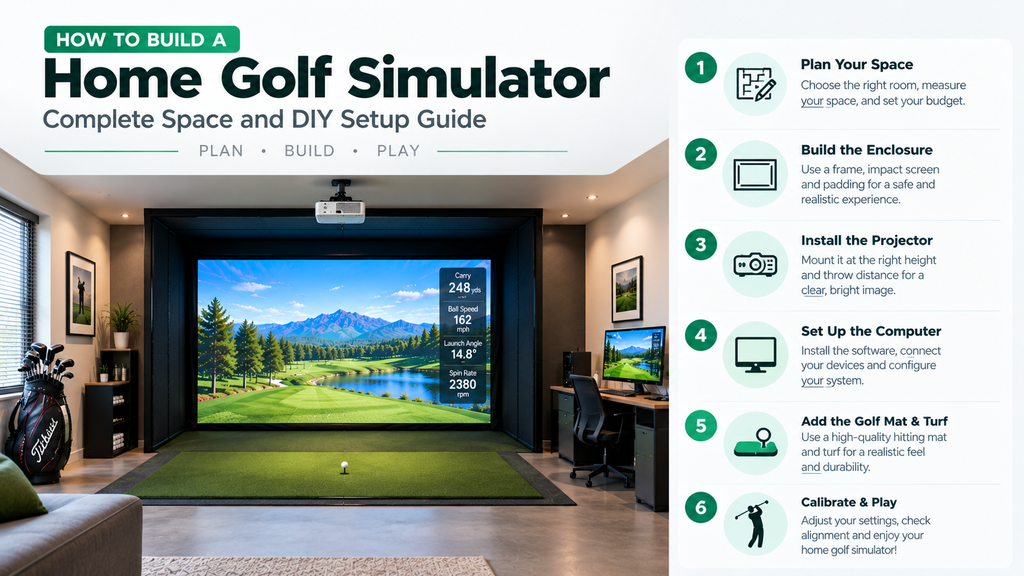
An at home golf simulator setup needs five things: a room big enough to swing, a launch monitor to measure your shots, an enclosure or net with an impact screen to stop the ball, a hitting mat, and a way to see the shot, usually a projector or TV. The order you do things in matters more than which brand you buy: measure first, choose parts that fit the room, then build, align and test.
This guide takes you through building a home golf simulator from an empty room to your first round, in 12 steps. Each step tells you what to do, what to measure, how to check you got it right, and what to do if you didn’t. Each one links to a detailed guide if you want to go deeper.
Key Takeaways
- Measure before you buy anything. As a guide, plan for a ceiling of 9–10 feet, a width of 12–15 feet and a depth of 15–20 feet, and test your actual swing in the space.
- Choose the launch monitor to suit the room: camera units beside the ball need the least depth; radar units behind you need the most.
- Build in order: frame, screen, mat, launch monitor, projector, computer, then a safety check before full swings.
- Get three distances right: ball 8–12 feet from the screen, several inches to a foot of gap behind the screen, and the launch monitor exactly where its maker says.
- Most kits take a weekend; custom rooms are usually done by professional installers.
Before You Start
| Item | What to expect |
|---|---|
| Time | Planning: an evening. Net setup: 1–2 hours. Enclosure kit: a day, sometimes two. DIY frame: one or more weekends. |
| People | Two for hanging the screen and mounting the projector |
| Tools | Tape measure (a laser measure helps), step ladder, painter’s tape, spirit level, drill and driver, stud finder, your driver club |
| Budget | About $700–$3,000 for a net setup; $5,000–$15,000 for most enclosure setups with a projector (see Step 3) |
| Skill level | Basic DIY for kits; carpentry for DIY frames; a licensed electrician for any new outlets |
Plan power, internet and climate early
These are easy to forget and awkward to add after the screen is up:
- Power: outlets for the projector (often on the ceiling), PC, launch monitor charger, lights and any heater. A licensed electrician can add ceiling outlets and dedicated circuits; new wiring usually needs a permit.
- Internet: software, updates and online play need a reliable connection. A wired cable or a mesh Wi-Fi point in the room avoids dropouts.
- Climate: garages and outbuildings get cold in winter and hot in summer. Insulation, a heater, a mini-split or a fan make the space usable all year.
- Light control: windows wash out the projected picture; blackout blinds help.
See golf simulator lighting and electrical requirements.
Permits, HOAs and house rules
Setting up a simulator in an existing room is usually just furnishing it, so most US homeowners don’t need a permit. You’ll usually need one if the project involves new electrical circuits (such as a ceiling outlet for the projector), framing walls, finishing a basement, converting a garage into living space or putting up a backyard building over your local size limit. HOAs may also need to approve exterior changes. Read our golf simulator permit guide before you start building.
Home Golf Simulator Setup at a Glance
| Step | What you do | Detailed guide |
|---|---|---|
| 1. Measure | Ceiling, width, depth and a real swing test | Space requirements |
| 2. Location | Prepare the garage, basement, spare room or shed | Garage and basement setup, sheds and outdoor |
| 3. Budget | Price every part, plus running costs | Golf simulator cost guide |
| 4. Launch monitor | Pick one that fits the room | Launch monitors compared |
| 5. Enclosure | Build a square, stable frame | DIY enclosures and kits |
| 6. Screen | Hang and tension the impact screen | Impact screens |
| 7. Mat | Place and secure the hitting mat | Hitting mats and turf |
| 8. Launch monitor | Position, level and align it | Launch monitor guide |
| 9. Projector | Mount it and fit the picture to the screen | Projector setup |
| 10. Computer and software | Install, connect and calibrate | PC requirements, software |
| 11. Safety check | Test before full swings | Safety guide |
| 12. Finish the room | Lighting, sound, flooring and comfort | Room design ideas |
Three example home golf simulator setups
| Two-car garage | Basement | Spare bedroom | |
|---|---|---|---|
| Typical space | 20 ft wide, 20 ft deep, 9–10 ft ceiling | 16 ft wide, 18 ft deep, 8.5–9 ft ceiling (lower under beams) | 12 ft wide, 15 ft deep, 8–9 ft ceiling |
| Layout | Centred bay at the back, away from the garage door | Bay between joists for maximum height | Offset bay; retractable screen |
| Launch monitor | Camera or radar | Camera beside the ball | Camera beside the ball |
| Enclosure | Full kit with side netting and top canopy | Kit sized to clear beams, ceiling padding | Compact kit or DIY frame |
| Extras | Heater, turf floor, club rack | Dehumidifier, acoustic panels | Rug and curtains for sound |
Setups for different golfers
- Left- and right-handed households: centre the hitting area and choose an overhead or radar launch monitor, or be ready to move and re-align a side-mounted camera unit.
- Families with children: extra side protection, a clear hitting area, junior clubs and software with family game modes.
- Seniors: a cushioned mat, an auto-tee and simple software make sessions easier.
- Serious practisers: spend on the launch monitor and mat, and add a camera or mirror for swing feedback.
DIY, kit or professional installation?
| DIY build | Kit | Professional | |
|---|---|---|---|
| Cost | Lowest | Medium | Highest |
| Time | One to several weekends | A day or two | Days (kits) to weeks (custom rooms) |
| Skills needed | Measuring, cutting, mounting | Basic assembly | None |
| Best for | Handy owners on a budget | Most homes | Custom rooms, high-end systems, tricky spaces |
If you’d rather leave it to an expert, read how golf simulator installation works and what it costs, and find a golf simulator installer near you.
Step 1: Measure Your Space and Test Your Swing
Space decides everything else: which launch monitor works, how big a screen fits and whether you can swing a driver at all. Measure properly before you buy anything.
| Measurement | Tight but workable | Comfortable |
|---|---|---|
| Ceiling height | 8.5–9 ft | 10 ft |
| Width | 10–12 ft | 14–16 ft (allows left- and right-handed golfers) |
| Depth (screen to back wall) | About 13–15 ft (camera launch monitors) | 16–20 ft (needed by most radar units) |
- Find the lowest point of the ceiling where you’ll swing. Measure from the floor to the lowest beam, duct, light fitting or garage door track over the hitting area, not to the middle of the ceiling. Add an inch or two for the hitting mat, which raises you up. Check: note the single lowest number; that’s your real ceiling height.
- Do a slow-motion swing test. Stand where the mat will go with your driver, the longest club anyone will use. Make slow, full swings while someone watches the clubhead at the top of the backswing and the end of the follow-through. Ask the tallest golfer in the house to do the same. Check: you want several inches of clearance at full speed; if the club touches or comes close at slow speed, you’ll hit the ceiling at full speed.
- Measure the width and mark your hitting position. For a centred bay, allow roughly 5 feet or more on each side of where you stand, so a full swing never comes near a wall. If left- and right-handed golfers will share the setup, the hitting area needs to be near the centre of the room. Check: swing with arms fully extended; nothing within reach of the clubhead.
- Add up the depth you need. Work from the screen wall back: the gap behind the screen (several inches to a foot), the ball-to-screen distance (typically 8–12 feet), your stance and backswing behind the ball (about 4–5 feet), and for a radar launch monitor the space the unit needs behind you (often 8 feet or more from the ball; check its manual).
- Do a worked example. With a camera unit beside the ball: 1 ft gap + 10 ft to the ball + 5 ft behind = 16 feet of depth. With a radar unit that sits 8 feet behind the ball: 1 + 10 + 8 = 19 feet, unless the maker allows a shorter ball-flight distance.
- Tape it out on the floor. Use painter’s tape to mark the screen line, the hitting mat and, if needed, the launch monitor. Walk around it, open the doors, check the car still fits if it’s a garage. Check: you can stand behind the hitting area, and nothing in the room has to move every time you play.
If the numbers don’t work: a lower ceiling may still suit irons and wedges, or a shorter driver swing; a short room points you to a camera launch monitor beside the ball and a ball-to-screen distance at the lower end of the range. See how high a ceiling you need, the minimum room for a golf simulator and whether a 12×12 room is big enough.
Step 2: Choose and Prepare the Location
Each common space has its own preparation jobs. Do them before the enclosure goes up, because they’re much harder afterwards.
Garage
The most popular choice: usually plenty of width and depth, and a hard floor.
- Check the garage door. When open, the door and its track often hang lower than the ceiling. Measure the clearance with the door open and closed, and plan to play with it closed if needed. Some owners fit a wall-mounted (jackshaft) opener to free up headroom.
- Decide where the car goes. If you still need to park, choose a retractable screen and a mat that rolls up, and tape out the parking space as well as the bay.
- Plan for temperature. Insulate the garage door and add a heater or fan; electronics and screens work best at room temperature, and so do you.
- Level the floor. Garage floors slope towards the door. Use a spirit level where the mat will sit, and plan a level sub-floor or shims if the slope is noticeable.
Basement
Often warm, quiet and out of the way. Ceiling height is the usual problem.
- Map the beams, ducts and pipes over the swing area, and put the hitting position between joists where the clear height is greatest.
- Control damp. A dehumidifier protects the screen, mat and electronics, and stops musty smells.
- Check light and power: basements often have few outlets, so plan where the projector and PC will plug in.
Spare room or living room
A spare bedroom works if it’s long enough, often with a retractable screen so the room keeps another use. Choose a launch monitor that sits beside the ball, protect the walls and windows with side netting, and plan furniture that moves easily.
Sheds, outdoors and portable setups
No room inside? A garden building, covered patio or a portable or inflatable setup can work, but plan weather protection, power and security first. Check local rules before putting up a new building: see our golf simulator permit guide and golf simulators in sheds, outdoors and on the go.
Step 3: Set Your Budget
A home golf simulator can cost from about $500 to $70,000 or more, and most complete setups cost $3,000–$15,000. Build the budget part by part, so nothing is forgotten:
- List every part: launch monitor, enclosure or net, impact screen, hitting mat, projector or TV, computer or tablet, software, cables and mounts, padding and lighting.
- Price each part at the level you need. The launch monitor affects realism most, so it usually takes the biggest share; a good mat is the next best place to spend.
- Add the running costs: software subscriptions and launch monitor memberships can cost hundreds of dollars a year.
- Add the hidden costs: shipping for large items, an electrician for new outlets, heating or cooling, and installation if you won’t build it yourself.
- Keep about 10% spare for the extras most people discover during the build, such as padding, longer cables or a better projector mount.
| Setup | Typical total | Includes |
|---|---|---|
| Net setup | $700–$3,000 | Budget launch monitor, net, mat; tablet or TV |
| DIY enclosure | $3,000–$8,000 | Launch monitor, DIY frame and screen, mat, projector |
| Kit setup | $5,000–$15,000 | Launch monitor, enclosure kit, mat, projector, PC, software |
| Custom room | $20,000–$70,000+ | Premium launch monitor, custom build, installation, finishing |
For a part-by-part breakdown see how much a golf simulator costs, and for bundles see golf simulator packages.
Step 4: Pick a Launch Monitor That Fits the Room
The launch monitor measures your shot. Answer these questions in order and the type usually picks itself:
- How deep is the room? Under about 16 feet: choose a camera unit beside the ball or an overhead unit. 16–20 feet or more: radar units behind you become possible.
- Will left- and right-handed golfers share it? Overhead units and radar behind the ball work for both without moving. Side-mounted camera units have to be moved to the other side of the ball and re-aligned.
- Do you also want to use it outdoors? Portable radar and camera units can go to the range; overhead units stay in the room.
- How high is the ceiling? Overhead units need enough height to mount within the maker’s range.
- What’s your budget, including any yearly membership?
| Type | Room depth | Left and right-handed | Outdoor use |
|---|---|---|---|
| Camera beside the ball | Least | Move the unit | Usually yes |
| Radar behind the ball | Most | Yes | Yes |
| Overhead (ceiling) | Moderate | Yes | No |
Compare models in our best golf simulators guide and launch monitor comparison, and read camera vs radar.
Step 5: Choose and Build the Enclosure
The enclosure surrounds the hitting area, holds the screen and contains mishits.
| Option | Typical cost | Pros | Cons |
|---|---|---|---|
| Hitting net | $100–$500 | Cheap, quick, portable | No projected picture; less protection |
| DIY frame | $300–$1,500 plus screen | Cheapest way to a full simulator; built to fit your room | Takes time and some skill |
| Enclosure kit | $1,000–$3,500 (more for premium) | Designed to work; screen included; quick to assemble | Fixed sizes; costs more than DIY |
How to assemble an enclosure kit
- Check the parts. Lay everything out and tick it off against the parts list before you start; missing connectors are the most common delay.
- Mark the footprint with painter’s tape, using your measurements from Step 1, with the screen line parallel to the back wall.
- Build the frame loosely, following the maker’s order (usually the back frame first, then the sides and top). Hand-tighten fittings so you can adjust.
- Square it. Measure the two diagonals of the front opening: corner to opposite corner. When both measurements are the same, the frame is square. Then check uprights with a spirit level.
- Tighten everything, and stabilise the frame as the instructions say (weights, ties to the wall or floor fixings), so it can’t rock when a ball hits.
- Fit the side netting and top canopy, pulling them evenly with no gaps where a ball could escape.
Check: push the frame firmly at the top corners; it shouldn’t sway or creak. Building your own instead? Our DIY golf simulator enclosure guide covers frames and materials, plus well-known kits such as Carl’s Place and SIG10 from Shop Indoor Golf.
Step 6: Hang and Tension the Impact Screen
The impact screen stops the ball and shows the picture. How you hang it decides how flat the picture looks, how loud each shot is and how much the ball bounces back.
- Unfold the screen on a clean floor and let creases relax for a few hours if it arrived folded.
- Attach the top first: the two top corners, then the middle of the top edge, then the points in between, using the bungees or ball bungees supplied through the grommets.
- Attach the sides, then the bottom, working from the centre of each edge outwards so the tension spreads evenly.
- Set the tension: taut enough that the surface is flat with no wrinkles, but not drum-tight. A screen that’s too tight bounces balls back harder and wears faster.
- Check the gap behind the screen: several inches to a foot from the wall or back netting, more for fast swing speeds, so a ball can never push the screen into the wall.
- Add a baffle (a loose curtain behind the screen) if your kit includes one; it absorbs energy and cuts noise.
Check: press the centre of the screen with your hand; it should give, then spring back without touching anything behind. Once the projector is on (Step 9), wrinkles show up clearly; re-tension the nearest bungees to remove them. See how to choose, install and clean an impact screen.
Step 7: Place and Secure the Hitting Mat
The mat is the part you touch on every shot. A good one lets the club glide through and protects your wrists, elbows and shoulders.
- Set the distance: measure from the screen to where the ball will sit. Use your launch monitor’s recommended distance, usually within the 8–12 feet range.
- Centre it to the screen: measure from the hitting position to the left and right edges of the screen; when the two numbers match, you’re aiming at the middle. For an offset bay, measure to a mark on the screen instead.
- Square it: the mat’s edge should be parallel to the screen. Lay an alignment stick on the mat pointing at the screen centre to check.
- Stop it moving: on a smooth floor, a rubber underlay or carpet tape stops the mat sliding on heavy shots.
- Add a stance mat or turf so your feet are level with the ball, and cover the floor to the screen to protect it from bouncing balls.
Check: hit a few wedge shots; the mat shouldn’t slide, bounce or lift at the edges. See the best golf simulator hitting mats and turf.
Step 8: Position, Level and Align the Launch Monitor
Most “the simulator isn’t accurate” complaints come from a launch monitor that’s in the wrong place or not aligned.
- Read the manual’s placement figures for your exact model: distance from the ball (beside or behind it), height for overhead units, and the hitting zone where the ball must sit.
- Mark the hitting zone on the mat (some units come with a marker or show it on screen) so you tee up in the same place every time.
- Level the unit if the manual asks for it; many have a built-in level or a setting in the app.
- Align it to the target. Most apps have an alignment routine. Otherwise, lay an alignment stick from the hitting zone to the centre of the screen and line the unit up with it.
- Protect it. Units beside the ball should sit where a heel or shank won’t hit them; overhead units should be clear of the club and skied shots.
Check: hit 10 easy wedge shots straight at the screen centre. If the launch direction averages several degrees left or right while the ball clearly goes straight, re-run the alignment. See the setup sections in our guides to SkyTrak, Garmin, Rapsodo, FlightScope Mevo and Uneekor.
Step 9: Mount the Projector and Fit the Picture
The projector should fill the screen without you casting a shadow and without being in your swing path.
- Work out the throw distance: throw ratio × screen width. A 0.5 throw ratio fills a 10-foot screen from about 5 feet.
- Choose the position: usually ceiling-mounted above or just in front of the hitting area, pointing at the screen centre. Check it’s clear of the backswing and follow-through.
- Fix the mount into joists or solid timber, not plasterboard alone.
- Turn it on and fit the picture: use lens shift, zoom or automatic screen fit first, and digital keystone only for small corrections.
- Test for shadows: stand at address and swing slowly. If your shadow appears, move the projector forward, higher or slightly to the side.
Check: the picture fills the screen edge to edge, is sharp in the corners, and doesn’t move when a ball hits the screen. Full details in our projector setup guide; to choose one, see the best projector for a golf simulator.
Step 10: Set Up the Computer and Software
- Prepare the computer: update Windows and the graphics driver before installing anything. Check your software’s PC requirements; most course-play programs need a Windows PC with a dedicated graphics card.
- Install the launch monitor’s app, then any simulator software (such as GSPro or E6 Connect), and sign in to your accounts and memberships.
- Connect the launch monitor using the method in its manual: Bluetooth, Wi-Fi, Ethernet or USB. Connect one device at a time and confirm the app shows it as connected.
- Connect the projector by HDMI and set Windows to the projector’s native resolution (Settings → System → Display).
- Set the software’s display to the same resolution and your screen’s aspect ratio, then adjust the picture size so it fills the impact screen.
- Stop the PC sleeping during a round: set sleep to “Never” while plugged in.
- Calibrate: hit 10 shots with a club you know well, such as a 7-iron, and compare the carry with what you hit outdoors.
Check: each shot appears on screen within a second or two with believable numbers. If not, see golf simulator PC requirements and our software guide.
Step 11: Run a Safety Check Before Full Swings
Golf balls leave the club at high speed, and indoors they can bounce back. Build up gradually:
- Walk the bay: no gaps in the side netting, padding on any exposed frame poles, nothing hard within reach of a mishit.
- Hit half-swing wedges first. Watch where the ball goes after it hits the screen; it should drop at or near the base, not roll or fly back to you.
- Step up gradually: full wedges, then mid-irons, then the driver, checking each time for balls hitting the frame or escaping the netting.
- Test a deliberate mishit zone: look at where shanks and thin shots would go, and add netting or padding there.
- Set the house rules: one person in the hitting area, spectators behind the golfer, children supervised.
If balls come back too hard: loosen the screen slightly, increase the gap behind it, check the ball-to-screen distance and add a baffle. Our golf simulator safety guide covers netting, padding and bounce-back in detail.
Step 12: Finish the Room
- Lighting: light the golfer, not the screen. Camera launch monitors need steady, even light on the hitting area.
- Sound: acoustic panels, a rug and a baffle behind the screen reduce noise; a soundbar adds course sounds.
- Floor: turf from the mat to the screen looks good and protects the floor.
- Comfort: heating or cooling, seating behind the hitting area, a club rack and a place for balls.
- Controls: a wireless keyboard or tablet stand near the mat, so you don’t walk to the PC between shots.
Get inspiration from our golf simulator room design ideas and see the accessories worth adding.
How to Set Up a Golf Simulator at Home: Quick Checklist
Use this to keep track during the build:
- Lowest ceiling point measured and driver swing tested.
- Footprint taped on the floor; depth adds up for your launch monitor.
- Space prepared: garage door clearance, damp, power, floor level.
- Budget includes software, shipping, electrics and 10% spare.
- Frame square (equal diagonals), level and stable.
- Screen evenly tensioned, not drum-tight, with a gap behind it.
- Mat at the right distance, centred and not sliding.
- Launch monitor placed to the manual, levelled and aligned.
- Projector clear of the swing, picture fills the screen, no shadow.
- PC updated, launch monitor connected, display matched, sleep off.
- Safety check done, working up from half-wedges to driver.
Common mistakes and how to fix them
| Mistake | What happens | Fix |
|---|---|---|
| Buying before measuring | Parts don’t fit; the driver hits the ceiling | Do Step 1 first, including the swing test |
| Radar unit in a short room | Missed or wrong readings | Check the manual’s distances; choose a camera unit for short rooms |
| Screen too close to the wall | Noise, wall damage, bounce-back | Several inches to a foot of gap; add a baffle |
| Drum-tight screen | Balls fly back; screen wears quickly | Loosen until it gives under hand pressure |
| Cheap, hard mat | Sore joints; mat wears out | A quality mat with a replaceable hitting strip |
| Launch monitor not aligned | Every shot starts left or right | Re-run the alignment (Step 8) |
| Projector in the swing path or casting a shadow | Damage risk; shadow on the screen | Move it forward or higher; use short-throw |
| No side protection | Shanks hit walls, windows or people | Side netting and padding before full swings |
| Forgetting power and internet | Extension leads across the floor; dropouts | Plan outlets and a wired connection before the build |
For problems after setup, such as shots not registering, lag or odd numbers, see our golf simulator troubleshooting guide.
Looking After and Upgrading Your Simulator
| How often | What to do |
|---|---|
| Every session | Check the hitting zone is clear; wipe dirty balls; charge battery units |
| Monthly | Check screen tension and look for wear spots; brush the mat; clean launch monitor lenses with a microfibre cloth; dust projector vents |
| Every few months | Rotate or replace the hitting strip; check netting for holes and fixings for looseness; update software and firmware |
| After moving anything | Re-align the launch monitor and re-fit the projector picture |
Upgrading over time
Many golfers start simple and upgrade. A common path is a launch monitor with a net first, then an enclosure and projector, then a better mat, then a better launch monitor. If you plan to upgrade, choose an enclosure big enough for a full screen and a frame that can hold a projector mount, and make sure your room depth suits the launch monitor you may want later.
Want to try simulator golf before building your own? Find a golf simulator venue near you.
Thinking of renting it out?
Some owners want to earn money from their simulator, by renting it by the hour, coaching or taking it to events. Charging customers changes the rules: you may need a home business permit, insurance and other approvals. Read how to start a golf simulator business and our guide to mobile golf simulator businesses.
Golf Simulator Setup Glossary
| Term | Meaning |
|---|---|
| Launch monitor | The device that measures your shot (ball speed, launch, spin and, on better models, club data) |
| Impact screen | A tough screen that stops the ball and shows the projected picture |
| Enclosure | The frame around the hitting area that holds the screen and side netting |
| Baffle | A loose curtain behind the impact screen that absorbs the ball’s energy and reduces noise |
| Hitting strip | A replaceable turf insert in the part of the mat you hit from |
| Stance mat | A mat you stand on, level with the hitting surface |
| Throw ratio | A projector’s distance-to-image-width ratio; lower ratios (short-throw) fill a big screen from closer |
| Offset / centred bay | Whether the hitting area is to one side of the room or in the middle |
| Auto-tee | A device that tees up the next ball automatically |
| Photometric | Camera-based measurement of the ball and club at impact |
FAQ
How much space do you need for a home golf simulator?
As a guide, about 9–10 feet of ceiling height, 12–15 feet of width and 15–20 feet of depth. Camera launch monitors need less depth than radar units. Always test a slow driver swing in the space before buying.
Can I build a golf simulator myself?
Yes. Many golfers build their own enclosure from a DIY frame and impact screen, or assemble a kit over a weekend. Professional installation is mainly needed for custom rooms, high-end systems and new electrical work.
What do I need for a home golf simulator?
A launch monitor, an enclosure or net with an impact screen, a hitting mat, a display (projector, TV or tablet), and software, plus a computer for most course-play programs.
What order should I set up a golf simulator in?
Measure the space, prepare the room, build the frame, hang the screen, place the mat, position and align the launch monitor, mount the projector, set up the computer and software, then do a safety check before full swings.
How far should the ball be from the screen?
Typically 8–12 feet, depending on the launch monitor and the screen. Too close increases bounce-back; too far wastes room depth. Follow your launch monitor and screen makers’ guidance.
How much does it cost to set up a golf simulator at home?
Roughly $700–$3,000 for a net setup, $3,000–$8,000 with a DIY enclosure, $5,000–$15,000 for a kit setup with projector, and $20,000 or more for custom rooms.
Do I need a computer for a home golf simulator?
For most course-play software, yes, usually a Windows gaming PC. Some launch monitors run on a phone or iPad, and all-in-one units have software built in.
How long does it take to set up a golf simulator?
A net setup takes an hour or two; an enclosure kit usually a day; a DIY build one or more weekends; custom rooms several weeks.